ToMCAT Dataset Curation
- Repopulating a table after bug fix
- Postgres Cluster
- Populating or updating the ToMCAT database
- Accessing the ToMCAT Dataset
- Exporting Postgres DB to SQLite DB
Repopulating a table after bug fix
Let's work out an example of how to proceed whenever we need to change some rule, resulting in a need to repopulate one of the tables in the ToMCAT dataset.
This is a real example of a change I needed to do in the raw EEG signals that were being converted to microvolt before persisted in the table eeg_raw. So, to fix this, I need to remove that conversion from the code and repopulate the eeg_raw and eeg_sync tables to reflect the unconverted values. The eeg_sync table entries need to be repopulated too because its content is derived from the entries in the eeg_raw table.
Note: all code changes steps below are in a new development branch. Scripts, however, were executed in prod mode, meaning they affected the Postgres database directly.
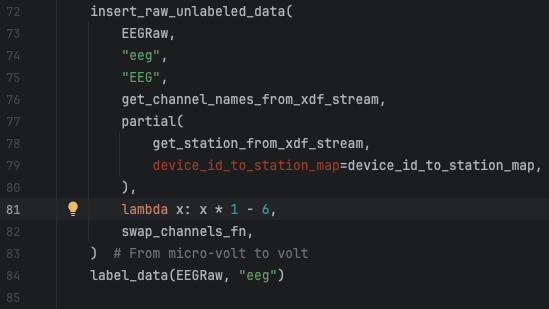
Step 1: Fix the bug (or change the logic)
This is an easy fix in line 81 of the file human_experiments/datasette_interface/datasette_interface/raw/process_eeg_raw_data.py.

Step 2: Pull the new code in Gauss
On Gauss, git pull and switch to the development branch we pushed the code change in the previous step to. Also, make sure to activate your virtual environment in Gauss so we can execute the script to repopulate the EEG table.
Step 3: Repopulate the tables
Before we run the script to update the eeg tables, we need to erase their content. This step is necessary because the table population script skips group sessions for which we already have data in the table. It was developed to be called incrementally, every time we run new experiments and have new data available.
Delete the content of the eeg tables
You can do this in a client application running locally on your machine and connected to the database server on Gauss or by connecting to the database directly in Gauss. The instructions below shows the latter.
# Run the following commands in a terminal connected to Gauss.
# The first command will connect to the database and open an interface from which we can call SQL commands.
# ekg and gsr sync tables need to be cleaned as well because raw EKG and GSR signals are columns in the eeg_raw table.
# Instead of deleting the contents, I prefer to drop the table which is quicker.
psql -p 5433 -h /space/paulosoares/postgres/run -d tomcat
drop table eeg_raw;
drop table eeg_sync;
drop table ekg_sync;
drop table gsr_sync;
Repopulate eeg_raw from scratch
Now that the table is clean, we can use one of our make commands to repopulate the table with the commands below.
# Be sure you are under the directory human_experiments/datasette_interface
# Replace db_pass with your Postgres password
# We need to first recreate the eeg tables because we dropped them in the last step.
# The command below will only create tables and indices that do not exist in the database.
# It won't affect existing tables.
working_env=production db_pass=<user_postgres_pass> make create_tables

# We use the TBS environment variable to reduce the data entitites we want to process. In this case, only eeg was affected.
# For a full list of entities available, do PYTHONPATH="." ./bin/populate_raw_tables.py -h
working_env=production db_pass=<user_postgres_pass> TBS="eeg" make update_raw
Repopulate sync tables from scratch
This step can only be executed after the former because the script to generate synchronized signals reads from the raw signals table.
# Be sure you are under the directory human_experiments/datasette_interface
# Replace db_pass with your Postgres password
# We use the N_JOBS environment variable to define the number of group sessions we want to process in parallel
working_env=production db_pass=<user_postgres_pass> N_JOBS=40 make sync_eeg
working_env=production db_pass=<user_postgres_pass> N_JOBS=40 make sync_gsr
working_env=production db_pass=<user_postgres_pass> N_JOBS=40 make sync_ekg
Step 4: Copy contents to the sqlite database
After the Postgres dataset is updated, we need to copy the new content to our sqlite database which we use to publish our dataset online. I currently have a copy of this dataset under /space/paulosoares/tomcat/tomcat.db which is the one I will update with the commands below. Later, this is copied to a final location where our dataset’s webpage links to.
Note: this is going to take a long time, even days. So it’s paramount we run this in a TMUX session if we haven’t been doing so with the previous commands. There’s a progress indicator but, after reaching 100%, you still may have to wait for a long time because of an operation called VACUUM we cannot disable with the postgres to sqlite library we are using. This operation optimizes the sqlite db file by removing empty segments. Those empty segments are mostly caused by deletions in the database which we do not have since our dataset is mostly readonly. So, there’s little to be optimized in space in our case thus it would be ideal if we could find a way to prevent this operation in the future.
# RUN IN A TMUX SESSION!!!
# The command below reads from the Postgres table by default so we don't need to set the working_env variable.
# Enlist the tables we want to copy with the TBS working variable.
TBS="eeg_raw, eeg_sync, ekg_sync, gsr_sync" make to_sqlite
Postgres Cluster
The pg_* functions are wrappers around the old way of setting up a cluster, using initdb. With the commands below (adapted from this discussion), I was able to create a new cluster in the desired location /space/paulosoares/postgres. Later, this folder may be moved to another directory if needed (some config below may need to be adjusted).
-
Create the folders where the data, logs and conf will be placed:
mkdir -p /space/paulosoares/postgres/data/11/paulosoares mkdir -p /space/paulosoares/postgres/run -
Create cluster specifying the directory where the data will be saved:
/usr/lib/postgresql/11/bin/initdb -D /space/paulosoares/postgres/data/11/paulosoares -
Change the config file to attribute a unique, unused port for the cluster
and change the location of the socket info:vim /space/paulosoares/postgres/data/11/paulosoares/postgresql.confchange
portandunix_socket_directories, for example:port = 5433 unix_socket_directories = '/space/paulosoares/postgres/run' -
Start the server. This will run in background:
/usr/lib/postgresql/11/bin/pg_ctl -D /space/paulosoares/postgres/data/11/paulosoares -
Create a database in the cluster (e.g. tomcat):
(Make sure the port matches the one defined above)createdb tomcat -h localhost -p 5433 -
Use it
(initdb has already created a superuser from your $USER name)
(Make sure the port matches the one defined above)
In the Postgres console:
- You can run\dtto get a list of tables in the database.
- You can perform normal SQL queries.psql -p 5433 -h /space/paulosoares/postgres/run -d tomcat -
Stop the server (if necessary). I never had to stop mine:
/usr/lib/postgresql/11/bin/pg_ctl -D /space/paulosoares/postgres/data/11/paulosoares
To check the status of the cluster:
PG_CLUSTER_CONF_ROOT=/space/paulosoares/postgres/data pg_lsclustersPort
It is important to set a port that is not being used by another cluster. The default 5433 has been
working for us.
Troubleshooting
- Check if the cluster is running:
PG_CLUSTER_CONF_ROOT=/space/paulosoares/postgres/data pg_lsclusters

- Start the cluster if not running (this happens after Gauss is rebooted):
/usr/lib/postgresql/11/bin/pg_ctl -D /space/paulosoares/postgres/data/11/paulosoares
Connecting to the DB from a local machine
An easy way to play with the database is to install a client locally and connect to the database
server. I use pgadmin as a client. Below are the steps to connect to a Postgres cluster on Gauss:
-
Download and install pgadmin locally.
-
Connect to Gauss with port forwarding in a terminal (use tmux for longer connections),
mapping the cluster port on Gauss to a local port of your desire:# For a cluster on port 5433 on Gauss to port 5433 locally # Note: "gauss" is an alias in my ~/.ssh/config for Gauss tunneling # through lectura. Adjust the name according to your alias. ssh -L 5433:localhost:5433 gauss -
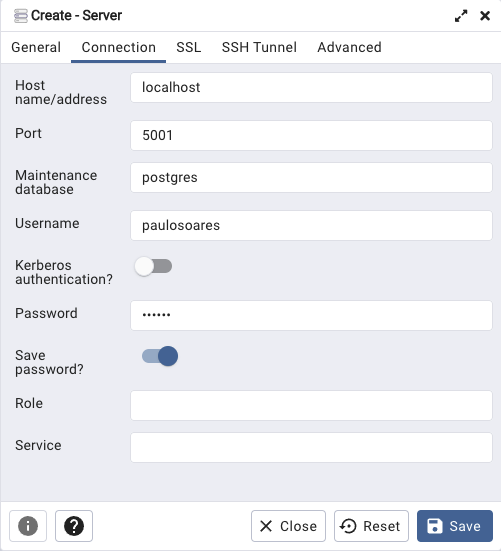
Open pgadmin and create a new server. Fill in the Connection tab as below and save:
-
Host: localhost
-
Port: 5433 (this is the local port used in the previous command)
-
Maintenance database: any database in the cluster (e.g. postgres). All databses will be visible regardless.
-
Username: your database username (typically the same as your OS username)
-
[optional] Password: the cluster password attributed to your user. All users can connect without the password set to them by default. So you can leave this field blank.

-
-
Use it
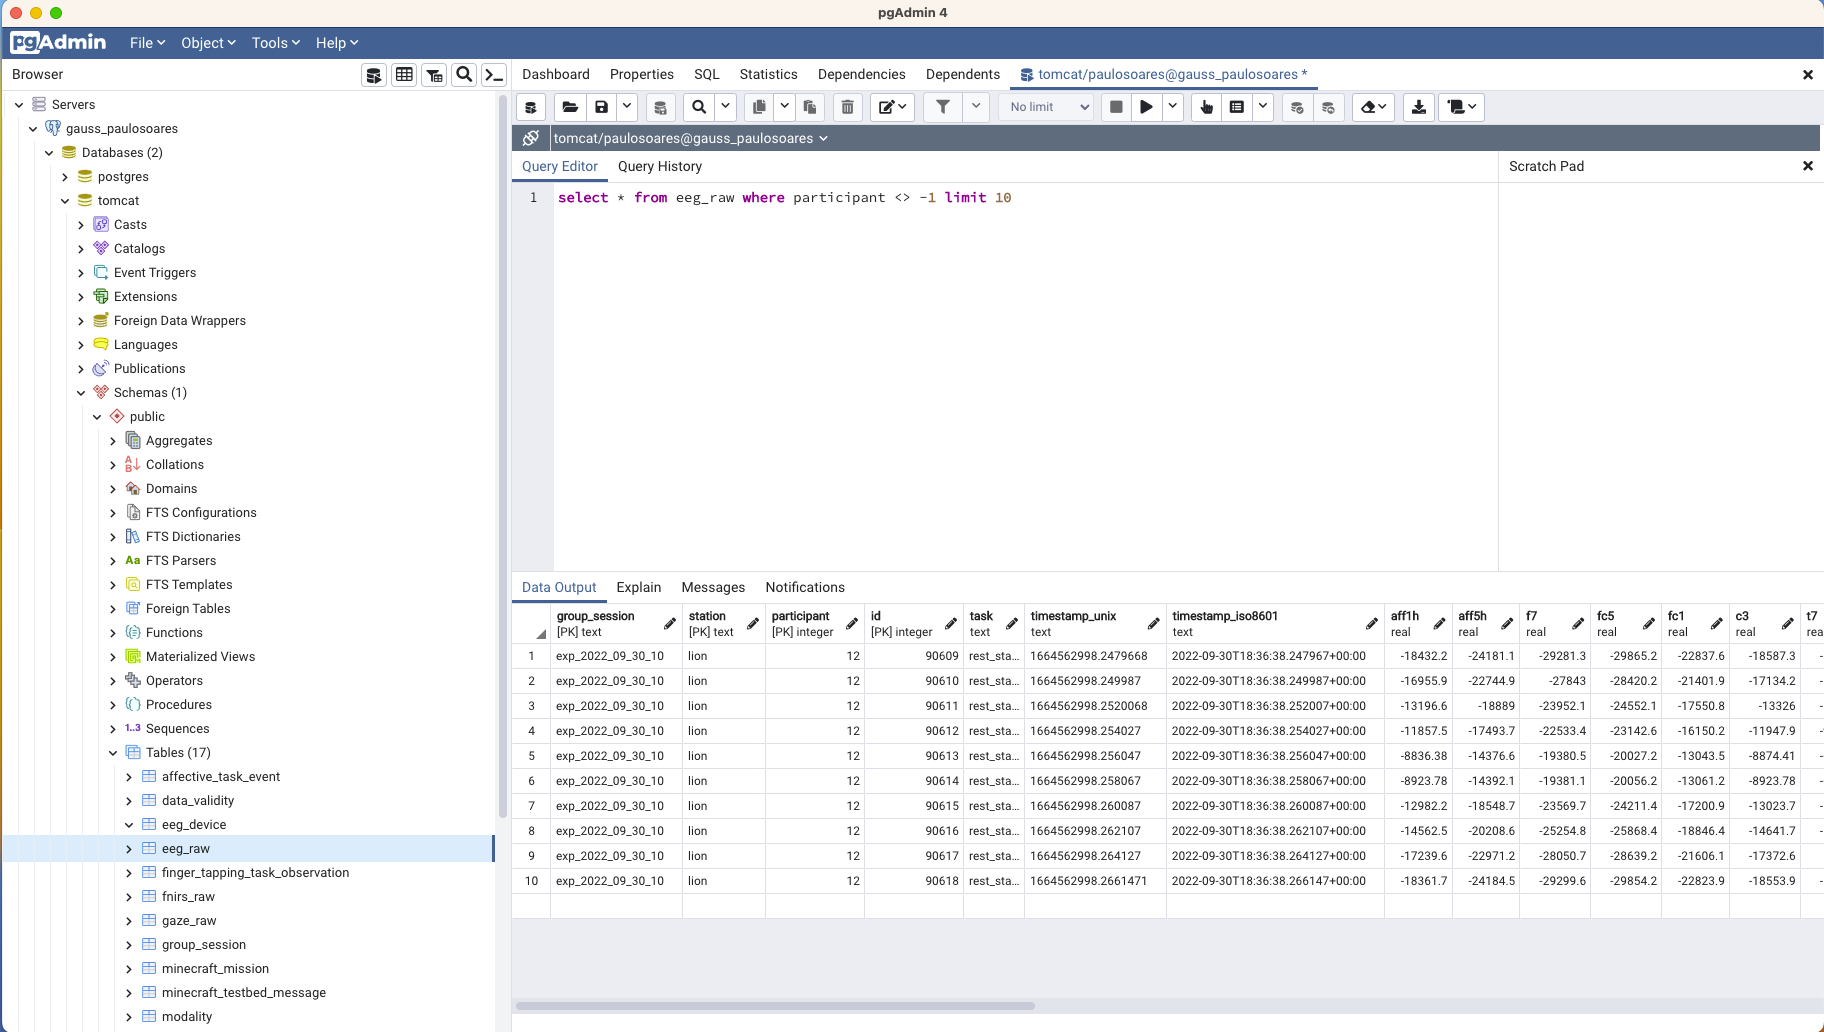
Now you should be able to see all the databases in the cluster in Gauss, including the one you
entered as maintenance database. We can query the tables and see their properties in a more
user-friendly way, as shown in the picture below:
New User
To create a new user and grant it permission to access the tables, do the following:
-
In Gauss, connect to the database:
psql -p 5433 -h /space/paulosoares/postgres/run -d tomcat -
Create the user:
CREATE USER <username>; -- List users and check the new user is there: \du -- Exit the CLI with: \q -
Save the following to a local file (e.g., ~/db_script ) replacing <username> with the username filled above:
DO $$ DECLARE table_name text; BEGIN FOR table_name IN ( SELECT tablename FROM pg_tables WHERE schemaname = 'public' ) LOOP EXECUTE 'GRANT SELECT ON TABLE public.'|| table_name || ' TO <username>' END LOOP; END $$; -
Grant select permission of all tables to the new user:
psql -p 5433 -h /space/paulosoares/postgres/run -d tomcat -a -f ~/db\_script
Superuser
The users created with the command above, can only select items from the tables. To modify
and delete them, they will need to have other permissions.
Another option is to give the superuser role to a user, this will grant them permission to do
anything in the database, including changing the permission of others. Use the command below
sparingly:
ALTER USER <username> WITH SUPERUSER PASSWORD '<password>'
-- Check the user is a superuser:
\du
Populating the existing tables
Instructions in:
https://github.com/ml4ai/tomcat/tree/paulosoares/praat/human_experiments/datasette_interface
Populating or updating the ToMCAT database
This procedure will show how to setup, initialize, and configure the virtual environment needed to run code and processes that will parse files saved during the experiments and save the data to the "postgres tomcat database". Also, a "sqlite" copy of this database can be generated to be fed to the "datasette interface" which exposes the dataset to the public in a webpage. The procedure and examples below assumes that you already have a "postgres" cluster installed, configured and running on "gauss", and that you have a database named "tomcat" running in that cluster. Note: "<username>" in the examples below is your username that you are logged in as on "gauss".
Installing Miniconda and activating a virtual environment
If not already installed, "miniconda" will need to be installed on "gauss":
mkdir -p ~/miniconda3
wget https://repo.anaconda.com/miniconda/Miniconda3-latest-Linux-x86_64.sh -O ~/miniconda3/miniconda.sh
bash ~/miniconda3/miniconda.sh -b -u -p ~/miniconda3
rm ~/miniconda3/miniconda.sh
Create a virtual environment using "conda":
conda create --name tomcat-database python=3.9Activate the "tomcat-database" environment:
conda activate tomcat-databasePrerequisites
Before building the "datasette" interface or populating the dataset, some dependencies need to be installed. Run the following command to do so:
pip install -r requirements.txtDatasette interface
The following make commands can be used to perform different operations on the "datasette" interface.
- create_datasette: creates a Docker image for Datasette with plugins.
- launch_datasette: launches the datasette Docker image.
Populating the ToMCAT database
The tomcat dataset is in a Postgres cluster that lives in /space/paulosoares/postgres. A series of make commands can be used to perform different operations on this dataset. The commands run by default in development mode, which uses an sqlite database created under /space/USER/tomcat/.dev. To modify the Postgres database, the commands need to be executed in production mode, which can be done by adding the following before each command:
working_env=production db_pass=<user_postgres_pass>Your user must have permission to modify the Postgres database in production mode.
Commands
- clear_db: [WARNING] drops the tables in the ToMCAT database. It must only be called if one really wants a fresh copy.
- create_tables: creates new tables and indices. If a table already exists, it won't be changed.
- update_raw: Adds new raw data to the relevant tables. This can be called to update the database with new experiment data. It will skip experiments already processed.
- sync_raw: Filters and synchronizes fNIRS and EEG signals with a main clock with frequency 200Hz that starts 1 minute before the rest_state task and ends 1 minute after end of the last minecraft trial. Synchronized signals are saved to the
fnirs_syncandeeg_synctables. - to_sqlite: Copies the Postgres database to an SQLite database for publication in the datasette interface. It runs in production mode automatically to make sure to read from the Postgres database. IThe environment variable
TBScan be used in conjunction with this command to specify a subset of tables one wants to copy, otherwise, all tables will be copied. Be patient and run this in a tmux session as this process can take several days depending on the size of the tables.
Miscellaneous
The following make commands can be used to perform different operations.
- update_inspect_file: Updates the
inspect-data.jsonwith the newest sqlite ToMCAT database. - generate_diagram: Generates the database diagram from the newest sqlite ToMCAT database.
- screenshots_to_server: Copies screenshot images to the web server for access though a public URL.
Accessing the ToMCAT Dataset
Overview
This guide provides instructions on how to access the ToMCAT database using either the public API or by directly connecting to the PostgreSQL instance hosted on the Gauss server via pgAdmin.
Access Options
Option 1: Accessing via Public API
You can access the public (SQLite3) version of the ToMCAT database programmatically using Datasette, through the following API endpoints:
Option 2: Working with a Local SQLite3 Database
You also have the option to download the SQLite3 database locally and work with it directly.
Option 3: Working with Postgres database on Gauss
Additionally, you can programmatically interact with the PostgreSQL database instance running on Gauss by following the steps outlined below.
-
Clone the ToMCAT Repository To begin, clone the ToMCAT repository and navigate to the
/toolsdirectory in themasterbranch:git clone <https://github.com/ml4ai/tomcat.git> cd tomcat/tools -
Set Up Port Forwarding To establish a connection between your local machine and the PostgreSQL database hosted on Gauss, use the port forwarding script:
./port_forwarder start gauss 5433 -
Download and Install
pgAdminDownload and installpgAdminby visiting the pgAdmin website. Be sure to download the appropriate version for your operating system. -
Register a New Database in
pgAdminAfter installingpgAdmin, follow these steps to register a new database connection:- Open
pgAdmin. - Right-click on Server in the left panel, click Register, and then select Server.
- In the registration form, enter the following details:
-
Host name/address:
localhost -
Port:
5433(the port forwarded from Gauss) -
Maintenance Database:
postgres - Username: Your (Gauss) username
- Password (optional):
-
Host name/address:
- Click on Save Password.
- Once the details are entered, click Save.
- Open
-
Verify the Connection After saving, you should now see the databases in the Gauss cluster, including the one entered as the maintenance database. You can now query tables and view their properties using the user-friendly interface provided by
pgAdmin.
Exporting Postgres DB to SQLite DB
This is a step-by-step procedure for exporting all tables and data from a Postgres database to a new SQLite database:
This procedure assumes that there is a fully populated Postgres database running on a specific port and that you are logged into the server as a user that has "super user" permissions to the Postgres database. This procedure is using code and functions stored in the GitHub tomcat repository - https://github.com/ml4ai/tomcat/tree/master/human_experiments/datasette_interface
It is recommended that after you ssh into the server where the Postgres DB lives, you run git pull to update to the latest code in the repository, check to make you have enough available disk space where the SQLite DB is going to be created, and enter a tmux session before running any of the datasette interface commands.
Installed apts used in this procedure:
- tmux
- mibicondo3
Examples used in this procedure are for a Postgres database running on gauss and that the SQLite database will be created on gauss.
-
SSH to the server where the Postgres DB lives using a user account that has "super user" permissions DB:
ssh gauss -
CD to the directory where the local repository is cloned and run a "git pull" to get the latest code:
Example:
cd ~/tomcat/human\_experiments/datasette\_interface git pull -
Start or attach to a "tmux session":
(You may have to install "tmux" on the server if it is not already installed)
It is recommended to use an app like "tmux" so that if you get disconnect from the server while running a long-running datasette interface command", the command will continue to run in a "tmux session" and you will be able to reconnect to that "tmux session" later.# Install tmux if not already installed on server: apt install tmux # Start a new tmux session: tmux # List current tmux sessions running: tmux ls # Attach to a running tmux session by session\_number: tmux attach -t <session_number> -
Verify that the Postgres DB is running on your specified <port>:
(If the Postgree DB is not started, start it)### Example Variables: port="5436" # Port the DB is running on. run_path="/fast/rchamplin/postgres/run" # Path to DB run directory. db_path="/fast/rchamplin/postgres/data/11/rchamplin" # Path to the database directory. db_name="tomcat" # The DB name. pg_ctl_path="/usr/lib/postgresql/11/bin" # Path to where pg_ctl is installed on server. # Check to see if you can connect to the running Postgres DB by command line: psql -p $port -h $run_path -d $db_name ### Example output: ### psql (11.20 (Debian 11.20-0+deb10u1)) ### Type "help" for help. ### tomcat2-# \dt<return> # to list tables. \q<return> # to exit command line interface. # If the Postgres DB is not running, start it: $pg_ctl_path/pg_ctl -D $db_path -l logfile start -
Using "minicondo3", activate the tomcat-database environment:
(if "minicondo3" is not installed, install it and create a tomcat-database environment)### <datasette_interface_clone_path> = Path to where "datasette_interface" github code is cloned. ### Example: ~/tomcat/human_experiments/datasette_interface # If not already installed, install "minicondo3" on server: mkdir -p ~/miniconda3 wget https://repo.anaconda.com/miniconda/Miniconda3-latest-Linux-x86\_64.sh -O ~/miniconda3/miniconda.sh bash ~/miniconda3/miniconda.sh -b -u -p ~/miniconda3 rm ~/miniconda3/miniconda.sh # After installing minicondo3, tell Linux to source ~/.bashrc # so that it will have PATH to condo commands: source ~/.bashrc cd <datasette\_interface\_clone\_path> # condo will now change prompt to show what environment is active (defalt is base) # Example: (base) rchamplin@gauss:~/tomcat/human\_experiments/datasette\_interface$ # If not already created, create a "conda" python=3.9 environment named "tomcat-database": cd <datasette\_interface\_clone\_path> conda create --name tomcat-database python=3.9 ### Example output: ### Retrieving notices: ...working... done ### WARNING: A conda environment already exists at '/work/rchamplin/miniconda3/envs/tomcat-database' ### Remove existing environment (y/\[n\])? n ### *** To remove a conda environment: conda remove -n tomcat-database --all *** # Activate the conda "tomcat-database" environment: source ~/.bashrc cd <datasette\_interface\_clone\_path> conda activate tomcat-database ### Example output: ### (tomcat-database) rchamplin@gauss:~/tomcat/human_experiments/datasette_interface$ -
Install all requirements from "requirements.txt":
The "requirements.txt" file is created when the "tomcat-database" conda environment is created. You install this file on the server using pip install. The files installs any prerequisites needed to setup your "tomcat-database" environment.pip install -r requirements.txt -
Export all postgres tables to SQLite db:
### For "TBS=" you can specify a list of tables, by name, to export:
### db_pass="tomcat" db_port=5436 db_name="tomcat" working_env="production"
### TBS="affective_task_event, audio_vocalics, data_validity, eeg_device, eeg_raw, eeg_sync, ekg_sync,
### finger_tapping_task_observation,fnirs_raw, fnirs_sync, gaze_raw, group_session, gsr_sync,
### minecraft_mission, minecraft_testbed_message, modality, participant,
### ping_pong_competitive_task_observation, ping_pong_cooperative_task_observation, post_game_survey,
### rest_state_task, screen_capture, station, task"
### make to_sqlite

### Or, you can specify "all" for all tables:
### db_pass="tomcat" db_port=5436 db_name="tomcat" working_env="production" TBS="all" make to_sqlite

db_pass="tomcat" db_port=5436 db_name="tomcat" working_env="production" TBS="all" make to_sqlite